Friday, October 26, 2018

to CREATE

A little more than a month a go, I took on 
a new "project". 
I have wanted to reorganize my craft room for a very long time. 
And finally- I ran out of excuses, space, and patience with never finding 
what I was looking for when I needed it!
All of that said,
Procrastination is far kinder than surviving the chaos created through a purge and reorganization... 
BUT in the end- it was worth it!
The room was packed full of 
"passions of my past"...
 The SAVES- "because I might need them again"-some day...
The: "I got it on SALE, & it was too good of a deal to pass ups"...
WIPS were everywhere... (btw, when did I start that & what was it suppose to be?)
And of course, The PROJECTS I planned-
 but never got to...
OH, And then there are all those FABRICS
I just loved & had to- had to- have!!!

Luckily, The furnishings were already there... 
I just needed to conquer the chaos 
& find a way to gain control over the space.

I started by going through every cabinet 
& every drawer. 
If I knew I would really use it- I kept it. 
If someone else could use it
it went in a box for donation
Otherwise- it was time to bid our fair wells and send it to the trash!!!

My energy was fantastic at the start 
and my piles were organized 
and easy to conquer. 👌

BUT,

The more I emptied and sorted- 
the less I could see of the floor or the table top.
 It was overwhelming and I needed to abandon and take no prisoners for the next day! 😱


Alas, the next day really REALLY buried me!
So, I decided to work on a smaller project 
and re-sort my fabric scraps & selvages... 
If they truly weren't large enough to use
it was time to part with it. 
Half were disposed of. 
The rest were sorted by color and neatly put aside.


I found these great gallon sized jars on line and then added chalkboard labels clothespins.
Now all my scraps, selvages, charms, and bindings earned their own coveted space as well!


Next up was my sewing space. 
The wall behind my sewing table has always been storage for all my threads. Leaning over it, I often could not reach the thread I needed
 and settled for another. 
Other times I knocked threads off the wall when quilting and projects pushed against them. 
Giving myself "a clean slate"- 
I decided to finally create 
"A THREAD STATION"

Thread racks "behind my sewing table"


Thread station is now on wall 
beside design wall and cutting table


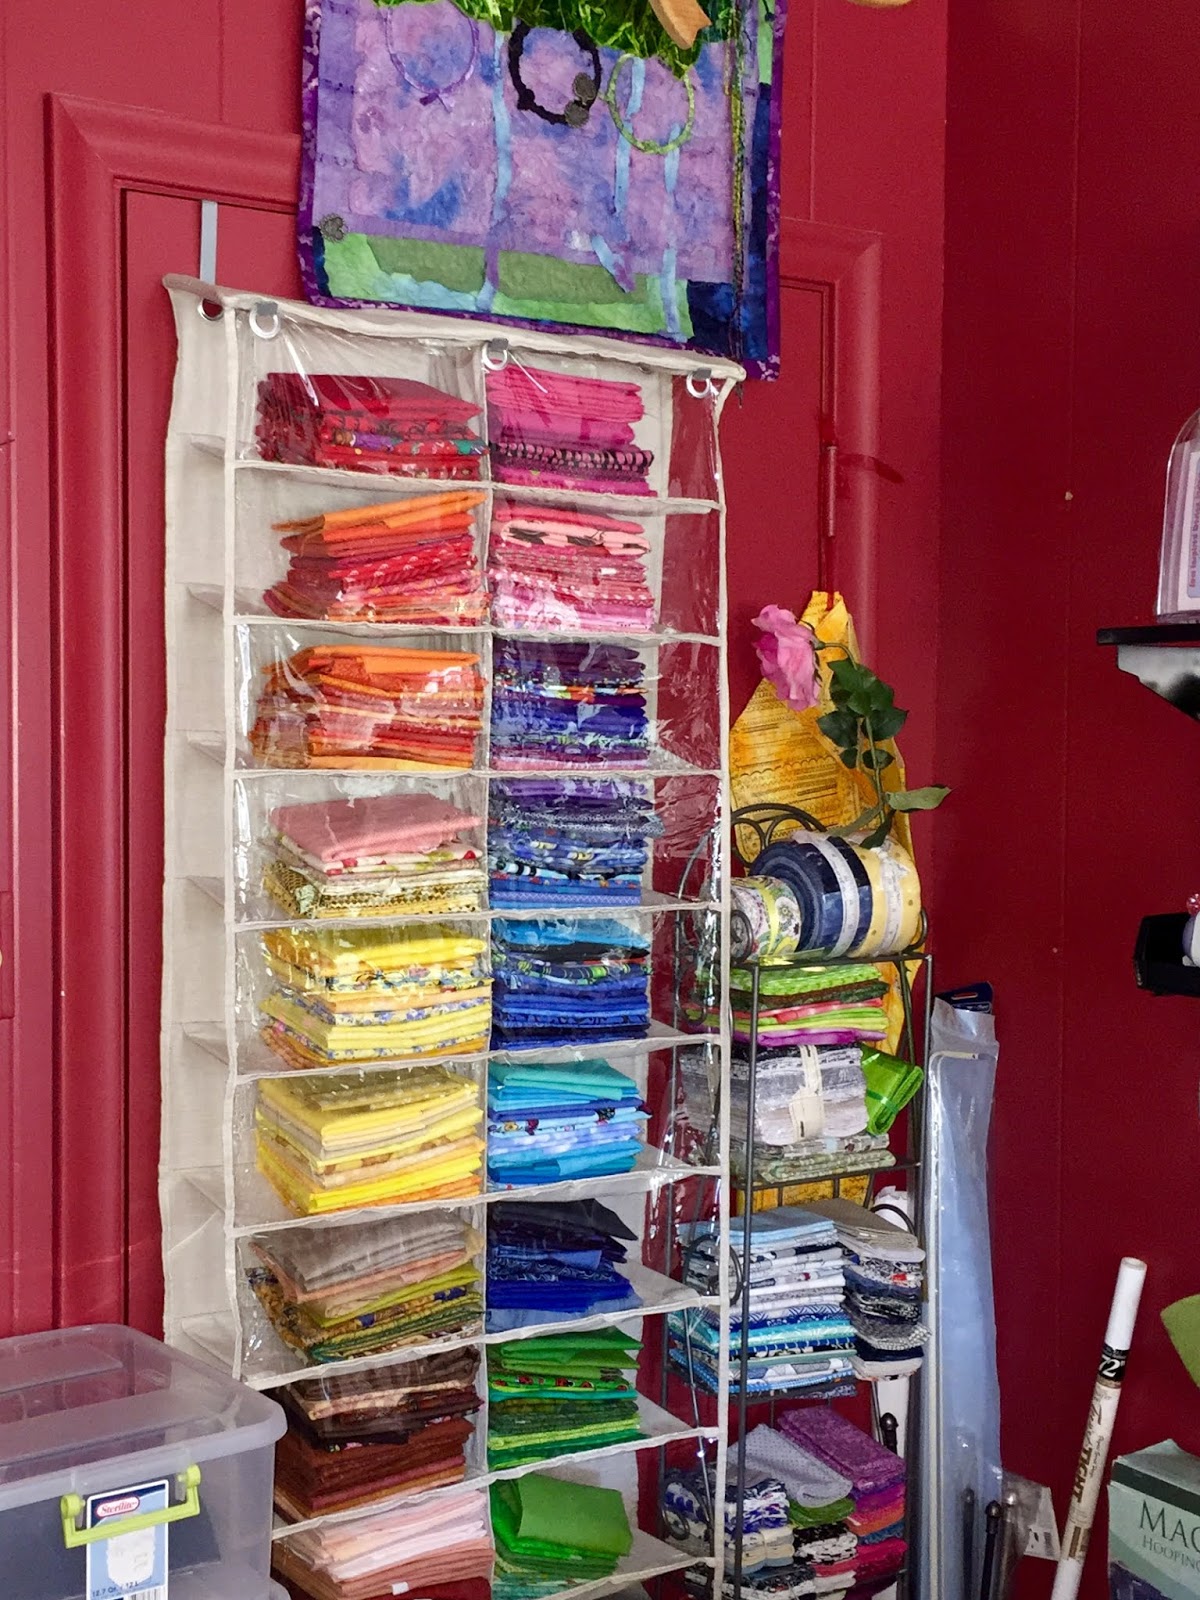
I refolded ALL my fabric larger than a fat quarter over comic book boards and 
sorted them by colors in to cubes and stacked 
most of them back on to the shelves. 
Fabrics I no longer was attached to- 
I put in the box to donate. 
Someone else will be excited to quilt with it and my styles have changed over the years.
I folded most fat quarters over 4 X 6 index cards. (unless they were already folded snazzy)


Now that the thread racks were moved, 
I finally had a place to put A PEG BOARD. 
For the first time I have storage to hang my embroidery hoops and other supplies!


Hanging from the door is a "shoe bag"
The openings are on the sides and are perfect for the fat quarters!


I had an old magnetic sheet I recycled to hold some of the odder shaped rulers and I am sure it will eventually acquire other assorted things 😝

AND FINALLY:
After 5 weeks:
I am done and I Love my space.
And I have no doubt the mini CREATE quilt 
I hung over head (made by my friend Tricia) 
will inspire me to 
CREAT
many special things to come...
(and now I will even be able to find 
my supplies to do so)


 WALL BEHIND SEWING TABLE

 THE WALL OF FABRIC

WALL OF THREAD, LAY-OUT, & CUTTING TABLE


It's my own little creative nook:
Welcome to the
ROBYN'S 💗 NEST


Wednesday, October 10, 2018

A Jelly Roll in Metalic Ombre

And another Jelly Roll Rug... Promising myself this one is home to stay!
Jelly Roll is Moda Metalic Ombre

2 rolls- of Bosal 2 1/2 batting on a roll

Strips pieced!

I still can't help myself over clipping that rope start!

The slowest stretch is merging the batting and fabric

That's one big ball of Rope ready to sew!

In basket on floor by my foot peddle while sewing


I like to spray with a rug protectant 

And finally:
Here she is!

Reminder: All 3 of these rugs were created with the help of Roma Lambson's Jelly Roll Rug pattern (from RJ Designs). 

Monday, September 17, 2018

Apples are Bloomin'

Have you committed to joining a "monthly project club for a year"? and then later wondered WTH was I thinking?

Well- here's a hoping I won't be saying those words a few months from now!

I decided to give it a go and 2018-2019 would be the year with the SHABBY FABRICS BLOOMING SERIES CLUB. There were several crafts I loved... but these wall hangings were all prefused & laser- cut applique that came with patterns, top fabrics, bindings & backings. They all finish approximately 11" by 17" and I can hang them & create a bit of a seasonally themed wall hanging monthly.

My kit arrived and sat on my table waiting for attention whilst I finished another rug. Now it was second week of September & I was finally ready to start my "September wall hanging".

That said... first I had to find my light box. When was the last time I used it?

... I think it was for that tracing... no wait, oh, I remember now. Hey- have to give myself memory kudos when I can :D 

The important thing is- I found it & created wall hanging. 


At last, my bouquet of fresh apples is ready for picking and as close as any of us in this Texas heat will be getting to doing so! 

I am pleased I finally finished it (even though it's past midway through the month). I wasted even a few more display days hanging my holder... 

Now, I can finally admire its crooked edges with a sense of accomplishment. 

Alas, Octobers block arrived today... I plan to make it my goal to finish it before the month starts??? (Time will tell)


Hanging on the wall beneath a finger painting
 my daughter created at age 5!


I am attaching a link in case you want more info and were not discouraged but what my wall hanging 
ended up looking like...
 Shabby Fabrics: Here for the details!


Monday, August 27, 2018

Texas Two Step with a Jelly Roll

Today I completed my second Jelly Roll Rug... & I've learned a lot. My first rug was a challenge not only to understand the technique, but also because my Babylock refused to cooperate. (It kept skipping stitches and drove me crazy!)

Before I started this next rug, I cleaned out every speck of lint and fluff. But it still didn't matter. For whatever reason, my Babylock Elisimo hates this rug and it still skipped stitches!!! I tossed and turned overnight and contemplated if it was time for another tuneup at my shop--- (they take weeks & these Texas rugs are for my kids). 

Then I decided to see if things went differently with another machine. I unpacked my Bernina "workshop" machine" & it was a VERY DIFFERENT EXPERIENCE. This rug seemed to WANT to be created and DID NOT SKIP STITCHES with the walking foot. Once I got past the first few twists, the rows started joining very easily and I found it to be rather relaxing. The only time my stitching went off, was when I would take my eyes off the needle & glance at the rug to admire my stitch work! 
But, I'm jumping ahead...

I used all the same supplies:
Roma Lambson's pattern, Moda's Bluebonnet Patch 
Jelly Roll, Bosal Katahdin precut batting, 
Auriful 50 thread & a jeans needle.

Since I knew exactly what I was doing this time 
everything moved very quickly. I chain pieced the strips. 
Cut seams & ironed them open to make the endless strip. 

I added the batting, triple folded it in and straight stitched in place using the walking foot. I continued carefully rolling in to a ball as needed. 
I didn't rush... all was relaxed.
Eventually my beautiful ball was ready for... 
UGHHHH!!!
Then I realized I screwed up!!!


SO, Here is what I learned:
I do know the technique to make the rug. 
But,
it is important to glance at the pattern for reminders! (Especially for me!)
I forgot that the outside of rug needed to be the first part of the strip to be prepped, sewn, & rolled...
AND
far more important: 
that is where the tapering needed to be!

That meant that by the time I finished my rug- I would not have a nice edge :( ...
Alas- I did not figure that out until my final 6 inches of rounding...

So there you have it- 
CHECK & RECHECK THE PATTERN INSTRUCTIONS!

My "rope" atop my first rug that I promised to mail out to my daughter:  


The disaster of skipped stitches caused by my babylock... and my attempting to resew over the rows repeatedly
I would eventually give up- 
& put my seam ripper to the challenge 


 I put my Bernina 350 in to the sewing table space
 normally housing my Babylock.
Not having a large flat surface became an issue later,
 since this rug is definitely not as flat as the first... 
but hopefully the starch took care of it.


Bernina 350: RickyTims Special Edition
Zig Zag Stitch 2: with walking foot at 5.5 width at 3 length


Rugs ready to ship for 
my daughter & my daughter-in-love

Thursday, August 16, 2018

My Bluebonnet Patch Jelly-roll Rug


Today I finally finished my Jelly roll rug!!! 

I cannot recall the last time I finished a big project (without looking back on this blog!!!)
Since I don’t drive or get about much these days, I was quite late to jump on the jelly roll rug band wagon…
I don’t remember if I stumbled on it on pinterest or FB the first time, but like just about everyone else, I fell in love with Roma Lambson's Jelly Roll Rug pattern (from RJ Designs). 

I finally ordered my supplies on line and was ready to give it a try. But nothing in my life is simple these days… And what started out as a jump on the jelly-roll rug bandwagon came to an abrupt halt. 
A family tragedy would relocate me out of town for 5 weeks. After my return, it would be weeks before I would have the motivation to do much of anything…

Roma Lambson's pattern is excellent! And it seems everyone on youtube & Pinterest was ready to cheer me on and offered up videos of their tips, screwups, and encouragements. So TY to all of the cheerleaders out there- 
My turn to pay it forward.

To make this rug, obviously you need a jelly roll. Since I haven't the patience to cut strips of my overstocked stash that I may need for "something someday"...
I purchased: Moda's Bluebonnet Patch 
You can also use your own left over batting and merge select strips... ummm, yeah- that wasn't happening.
Bosal Katahdin sells a precut 2 1/2" batting to make this more doable & I bought 2 rolls... 
I pretty much left the strip arrangement as is since Moda did a great job of making it flow. But- I wanted a navy border, so I did pull those fabrics to the beginning of my strips... 


The pattern said to make long fanfolds to tame the long strip… but then "THE CALL". 
I knew I was about to leave town, so I wrapped mine around a piece of cardboard and sadly it stayed like that for a hellish 2 months… 


Eventually... I started to stare at everyones postings again and reentered my sewing room and decided to give it another go...

"Roping" takes longer than any other part of this and I honestly wondered why on earth I was not just buying a rug at Target...

I followed all the pattern instructions... except for rationally clipping... I used every clip I owned on that first color strip to get started!!! My Purple Thang had no wheres to go!
But eventually I relaxed and clipped further and 
further apart.


& by the time you create that basketball sized ball of fabric rope it is such a sense of accomplishment- you can't wait to start making your rug.


My biggest problem was skipped stitches. 
I changed my needle 3 times. I could literally hear them getting dull!
I took apart and cleaned out threads & batting fluff from my machine. 
I switched between my straight, open, overlock, & walking feet. I played with different threads & adjusted my tensions... 
Each day I did a few more rows & starched & pressed the hell out of them for a week or "sew".

In the end, I concluded: for my 7 year old Babylock Elisimo- my walking foot was best joining the roping to complete the rug. 
And-
I wasn't going to sweat a slipped stitch here and there- it's a rug, not an heirloom quilt!

Actually- I look forward to making my next one!


and finally: